Adding Project Members
Adding Project Members
![]()
PROJECT MEMBERS
| • | Click Project Set-up, Project Members |
| • | Your member list will show those users set up in Project Information |
 Add User to Project – a User is a person who will have access to StratusVue. You also have the option to add Contacts. A contact is someone who will not have access to the system
Add a User to Your Project
| • | Click on the Add User to Project Icon |
| • | The People Picker screen will come up. Those members who were assigned in Project Information will show. |
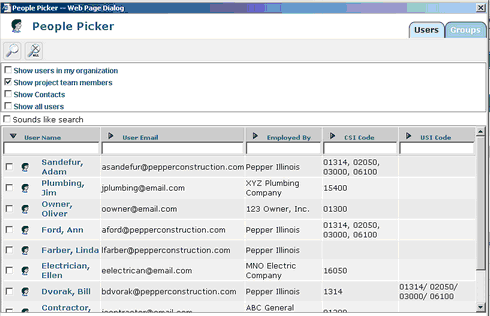
| • | It is important that you select the correct criteria for your search |
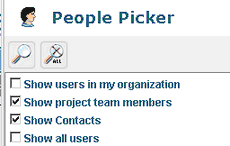
- Show users in my organization –
- Show project team members – All Project Members
- Show Contacts – All non-users in system
- Show all users – All Users in system
Select the appropriate criteria
Enter criteria in the Search fields and click the search icon ![]()

Click the selection box to the left of the user name to assign members
![]()
Click the Close & Add Select Button at the bottom right corner
Add a New User
Click on the Create New User in Project Icon ![]()
This will bring up the Create User screen.
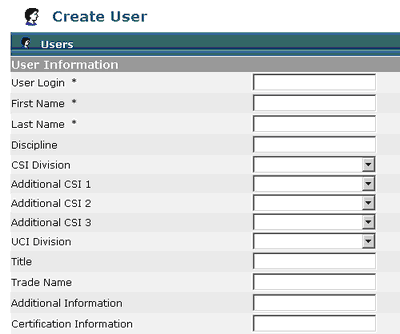
Users Information
| ▪ | Insert User Login (Suggestion (first initial,last name)) |
| ▪ | Insert First Name |
| ▪ | Insert Last Name |
| ▪ | Discipline (architect, subcontractor, etc.) |
| ▪ | CSI Division (if applicable) – you have the option to insert primary and secondary CSI codes. |
| ▪ | UCI Division – you have the option to create UCI codes in List Management |
| ▪ | Insert Title (if applicable) |
| ▪ | Insert Trade Name – this will show on the Project Directory |
| ▪ | Fill in Additional Information in the fields supplied if applicable |
| ▪ | Certification Information (minority status) |
Note: All fields with an “*” are required fields and must be filled in.
User Email

The Notification Email Address is for a secondary person who needs to receive all notifications for new user.
| • | Insert the users email address. |
| • | Notification Email Address is used by a secondary person who will receive the users email notifications. |
Company Information – When adding a new user, you have the ability to attach them to an existing
company or create a new company to be added into Plans and Specs.
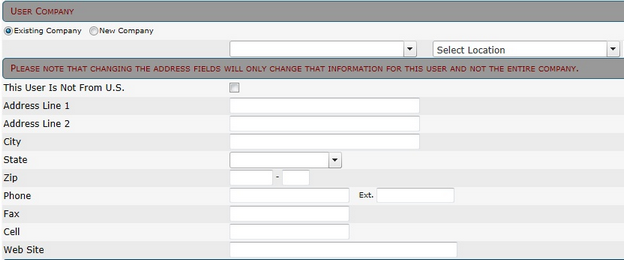
Existing Company
The program defaults to existing company meaning that the user being inserted is with a company that is already in the database.
| • | Organization/Location – select the company the user is employed by typing the first few letters of the company name; a text box will come up where you can select the company name. If the company has several locations, use the drop down box to select the appropriate location. |
| • | User Address – this information will default from the company chosen under Organization. |
New Company
Use if this is a company that is not entered into the database.
Select circle to the left of New Company
| • | New Organization – insert the complete name of the new company as you want it to show in the database. |
| • | User Address – insert all appropriate phone and address information for the new company. |
User Default Role

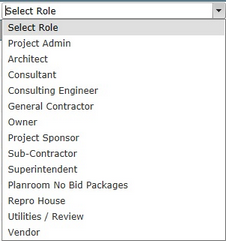
| • | User Role – assign a role to the user via the drop down box. |
| • | Always make a point to assign a default role to a new user, every time they are added to projects from this point forward, they will be added with the role assigned here. |
| • | By assigning a role to a user you are giving them a specific set of permissions to work within the system. Please follow the following schedule of permissions. |
Administrator – Project Admin Only
Architect – Architect and/or Design Consultants
Consultant – Any type of Consultant on the project
Consulting Engineer – Electrical, Mechanical Engineers, etc.
General Contractor – GC - CM Users only; All Superintendents
Owner – Owner
Sub-Contractor – Subcontractors and Vendors
Superintendent – Subcontractor Superintendents
User Password Information
| • | User Password – Enter a password for the user and re-enter to confirm. This will be their initial password to access the system. They will have the option to change this password. (See User Profile) |

Click on the Save Button to submit the new user to the Group Admin for approval. Once approval is given, an automatic email is generated and sent to the new user with their password and user ID information.

Once you have attached a new team member, be sure to confirm that the user has been assigned a role in the project.

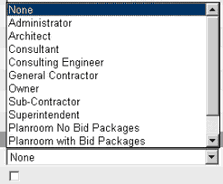
| • | Click on the new team members name |
| • | This will bring up the User Info screen |
| • | Select a role for the user/contact |
| • | If the new member is a user, click on the selection box to the right of Is Active. |
Note: When assigning a permission to the blue printer, or imaging company, use Repro House Production for their permission level.
